Wildlife Photography Without a Long Lens
Wildlife photography is something of a battle. The first part is finding wildlife, of course, but the really tricky bit is getting up close. You may well have the kind of ninja skills that allow you to get within range, but you’re still going to end up lusting after those big, expensive lenses to close the final gap that lets you get the shot.
But what can you do if you don’t have one of those fat, juicy primes?
Well, there’s always the option of camera traps. These are basically sensors that trigger your camera when something sneaks past, but – again – they require extra money. A cheaper option is a wireless trigger, a bit like the remote you use to change channels on your tv, but again… money.
The real trick is to know your camera. Most modern cameras have got all kinds of features that hardly anyone uses, and there are two that are great at making up for the lack of a long lens: time lapse and smartphones.
Time lapse
When most people think of time lapse photography, they think of grand vistas, with clouds sweeping across the sunlit sky, or maybe even the majesty of a nature program where the time lapse shows a butterfly emerging from its pupa. But it’s possible to use time lapse techniques to just take standard photos as well.

Images of a grey squirrel caught using time lapse photography. Taken using OM-D E-M1 Mark II at 90 mm using 40-150 mm f2.8 Pro Lens.
How do you do it?
The first thing to consider is the actual way a time lapse works. What you’re essentially doing is taking a series of images at a set interval which are then combined into a movie. Step back from that final result and look at the images. What you’ve got is a way to take a shot every few seconds, minutes, or even hours. So, if you know a bird perches on a branch regularly, just point the camera at the branch and set it to take the photos. Or maybe you know that a fox walks along a path in the local forest just before sunset each night. Set your camera up to focus along the path and then hide somewhere off in the distance to see what happens. Having a popup hide is fantastic in this sort situation.

Position the camera to look along a branch so that it can capture images of any birds perching there. Taken using OM-D E-M1 Mark II at 50 mm using 40-150 mm f2.8 Pro Lens.
What do you need?
The first thing you’ll need is a camera. This doesn’t have to be something expensive. I’ve got an Olympus O-MD E-M1 Mark II, but I’ve also got an Olympus TG-5 which is fantastic for this type of thing because it’s built like a tank and you can put it right down on a trail or clamp it up on a branch without having to worry about it.
The next thing is a tripod. You can get away with just putting your camera on a stable surface, but it’s much better to anchor it somehow. A tripod creates stability and, if you get something like a GorillaPod with its snaky legs, you can clamp the camera up in a tree, or on a post, in a position that would be impossible using a standard tripod.

Placing a camera low down on the ground gives you an eye-level view. Squirrel image taken using an Olympus TG-5 at 5.14 mm.
And that’s it, really. You could add a flash to the mix, but it’s not vital and you should never use one when photographing certain wildlife, owls for example, because the bright light can harm their eyes.
One other thing to consider is batteries. You’re going to be taking a lot of photos, so having a spare battery in your pocket is a great idea. If your camera has the ability to add a battery grip, then slap it on because that extra power will allow you to capture far more images. Some cameras, such as the lovely Olympus OM-D E-M1 Mark III, allow you to charge the camera while using it. Just add an external USB power pack and the camera will basically run forever.
Settings
Setting up a time lapse in camera is simple. Head into the menu and search for the time lapse options. They’ll be in one of the shooting menus. Navigate through to the time lapse settings and you’ll see a screen similar to this one:

Menu screen for time lapse settings.
Most of the settings are self-explanatory. Number of Frames is just the number of images you want the camera to take. I suggest setting it to the maximum for your camera because you want the camera to keep taking photos for as long as possible. Interval Length is important because it governs how frequently the camera takes a picture. You’ll have to play around with this, but I tend to use something around the ten second mark. Longer and you risk missing out on the action, shorter means that your camera will take photos over a shorter period. Play around with it to see what works for you.
The final thing to decide is whether you want to have the camera generate the actual time lapse movie by setting Time Lapse Movie to On or Off. I always have the camera generate a movie because it’s a great way to quickly see whether you captured any wildlife. If you’ve taken 999 shots, checking through them all takes ages, but watching the full time lapse movie only takes a couple of minutes, which is great, and it’s always exciting to grab the camera and take a look.
Field of View
One of the hardest aspects of working with time lapse shooting for wildlife is thinking about your field of view. You want to position the camera so that the wildlife is in frame for as long as possible. Remember, you’re not going to be able to alter the position for each shot because shooting a time lapse is a hands-off experience. Pointing the camera down a track gives the camera a larger window of opportunity to trigger than if it’s looking at the scene from side on. Same thing if it’s looking along a tree branch. If a bird lands somewhere along the perch, chances are that you’ll get some kind of result, but if the camera is looking at the branch from the side, then the bird might land just out of view.
So, think about position. Approach the scene with your camera in hand and try to look at it from different directions while considering how that field of view will give you sufficient time to get a shot.
Autofocus Mode
One of the most frustrating things about using time lapse shooting is if you mess up your focus. You’ve got a few options. If you know exactly where your wildlife is going to be, you can manually focus on the scene and then sit back and relax. Trouble is, if the wildlife doesn’t follow your plan then you’re pretty much stuffed.

This shot of a rook was taken using manual focus. I placed a box in the position I thought the birds would take and then focused on it. I then removed the box and placed some bird seed on the ground to draw them in. Taken using OM-D E-M1 Mark II at 67 mm using 40-150 mm f2.8 Pro Lens.
So, it’s probably easier in a lot of circumstances to rely on the camera’s autofocus to do the work. Single point autofocus works well if the wildlife is going to be in a set position. Otherwise, one of the group autofocus modes is prefect. The animals or birds can vary their position and the camera will take care of everything. It won’t be perfect. You’re still going to get some shots that are out of focus, but you’re also going to get a lot of great results.
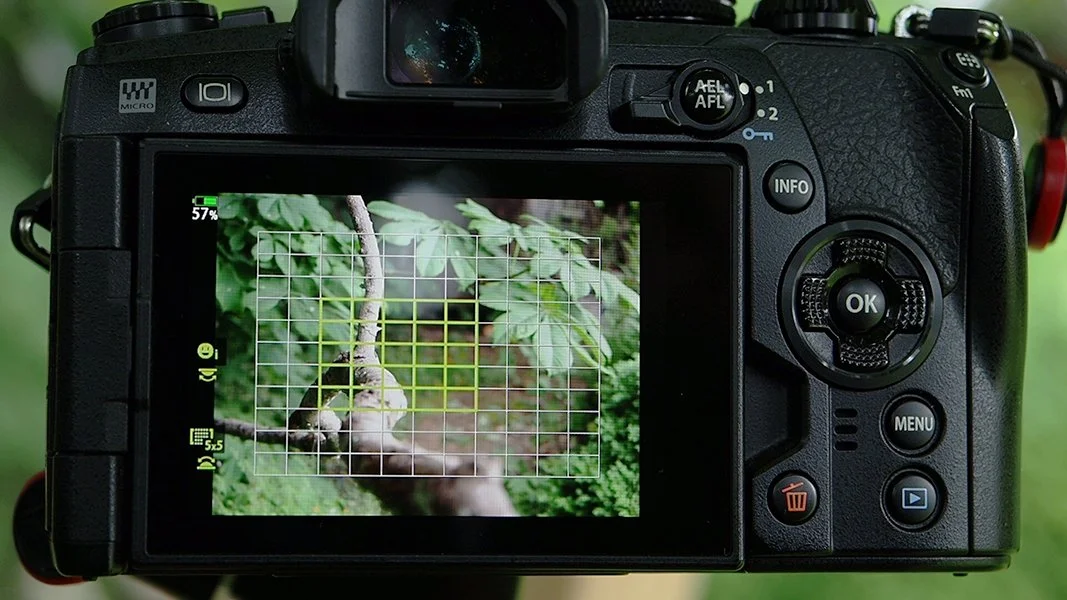
I used a 5x5 grid to grab focus on any birds that landed on this branch.
Smartphones
Most cameras can link up to a smartphone or tablet using a downloadable app. Olympus Image Share is perfect for the job. You’ll find full instructions on how to link the app to your camera in your user manual, but the short version is to turn the camera’s WiFi on and then scan the QR code on the back of the camera using your device. This creates a wireless network link between camera and phone.
Once you’ve connected the app to your camera, you want to use the app’s Remote Control option. This essentially turns your device into a remote trigger for the camera. You can see what the camera sees, alter shooting modes and things like aperture, shutter speed, and so on. There’s a big shutter button on the screen and you just tap it to start taking pictures or recording video. It really is that simple.
You’ll have to test the range that you can operate at. Go too far and the signal will drop out, so run some tests before you want to start taking photos.
You don’t have to worry about which area autofocus mode you’re in when using your smartphone because you can just tap the screen to trigger the autofocus at that point. And, if you want a bigger view of the scene, connect the camera to a tablet for a lovely, large screen experience.

Chaffinch perched on the same branch as the jay but much closer to the camera and then cropped in tightly for emphasis. Taken using OM-D E-M1 Mark II at 50 mm using 40-150 mm f2.8 Pro Lens.
It’s just a matter of patience…
Just like all wildlife photography, you’re going to need patience. You’re going to get tons of shots showing nothing at all when you try out time lapses, and you may have to sit for hours waiting for something to happen while staring at your phone. But this is just part of the fun. You don’t know what’s going to happen, or when, but you’ll be able to get beautiful images that would’ve been impossible without the aid of a long lens.
Try it and see what you think, but just enjoy being out there. Wildlife photography is an adventure.